Wondering how to back up your iPhone to a Mac? Connect your iPhone via cable, open Finder, click your iPhone under Locations, select “Back up all of the data on your iPhone to this Mac,” then click Back Up Now. Alternatively, go to iPhone Settings → iCloud → iCloud Backup → Back Up Now for a wireless backup.
Your iPhone holds a ridiculous amount of your life: photos, messages, passwords, documents, and years of memories. Imagine one morning, you drop it on your bathroom tiles, or an iOS update goes sideways. Or your phone just stops turning on. How will you recover all your iPhone data if you don’t have a backup?
The odds of losing your iPhone data are real, and when it does, the only thing standing between you and losing your data is a backup you made before things went wrong. Making a backup takes less than five minutes to learn and could save you from an awful headache.
Let’s walk through the different iPhone backup methods, step by step.
Method 1: How to Back Up iPhone to Mac Using Finder (Wired)
This is the most reliable method and the one Apple recommends to back up your iPhone to a Mac. You need macOS Catalina (10.15) or later (including newer versions like macOS Tahoe) to perform this backup.
If you’re still on macOS Mojave or older, you’ll need to use iTunes instead. If your Mac supports newer macOS versions, we recommend updating it, but some older Macs may be incompatible with newer releases.
What You’ll Need
- A USB-C or Lightning cable (whichever your iPhone uses)
- Your Mac is plugged into a battery charger or has a decent battery
- Enough free storage on your Mac (a full iPhone backup can run anywhere from 5GB to 60GB+, depending on the size of data)
How to Back Up iPhone to Mac via Finder
- Connect your iPhone to your Mac using a cable.
- Click and open Finder; the blue smiley face icon (Happy Mac logo) at the far left.
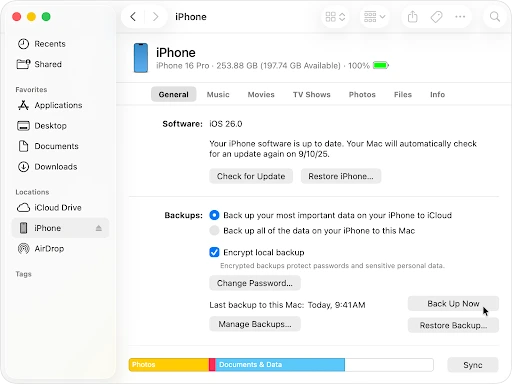
- In the left sidebar, under Locations, click on your iPhone’s name.
Source: Apple (Image © Apple Inc. Used for commentary/review purposes)
- Click the General tab at the top of the screen.
- Under the Backups section, select “Back up all of the data on your iPhone to this Mac.”
- Click Back Up Now.
- Wait for the progress bar to complete. Do not unplug your phone.
Source: Setapp
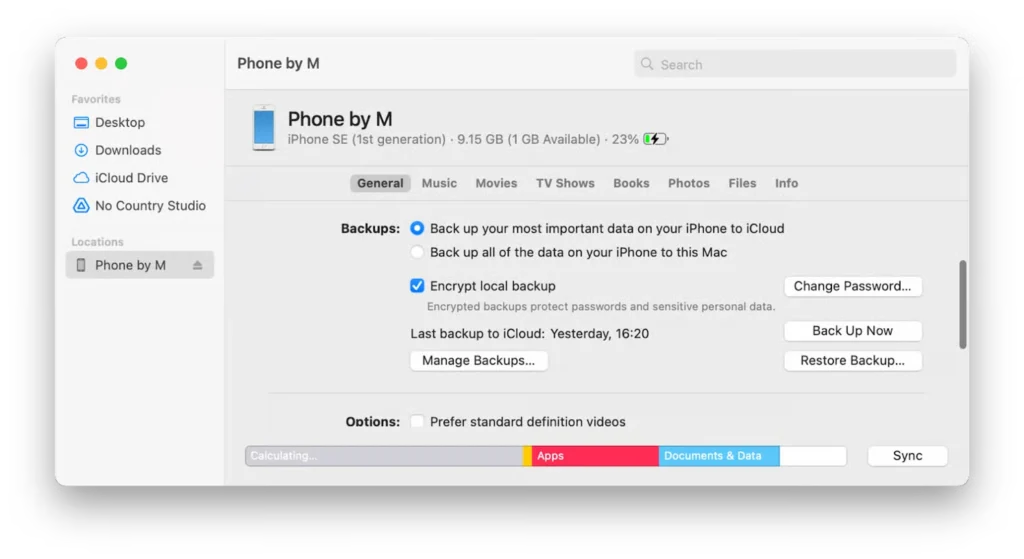
That’s it. When the backup is complete, Finder will show you the date and time (see the red arrow in the image above) of the last backup right there on the same screen.
How to Enable Encrypted Backups
By default, a standard Mac backup does not fully preserve sensitive data in a usable way. While Keychain data may exist in unencrypted backups, it cannot be securely restored without encryption because Apple ties it to device-level security.
Enabling encrypted backups ensures passwords, Wi-Fi credentials, Health, Activity, and other sensitive data are fully restorable.
To ensure everything is backed up and restorable, turn on “Encrypt local backup” (see the red arrow in the image below) and set a password you won’t forget. Once encryption is on, future backups will automatically include Health, Activity, and Keychain data. It’s worth the extra thirty seconds.
Source: Apple (Image © Apple Inc. Used for commentary/review purposes)
Method 2: How to Back Up iPhone to Mac Wirelessly (Wi-Fi Sync)
Plugging in a cable every time may damage it in the long term. Fortunately, once you’ve done one wired backup, you can set up Wi-Fi backups so your iPhone backs up to your Mac whenever they’re on the same network.
Steps to Enable Wireless Backup
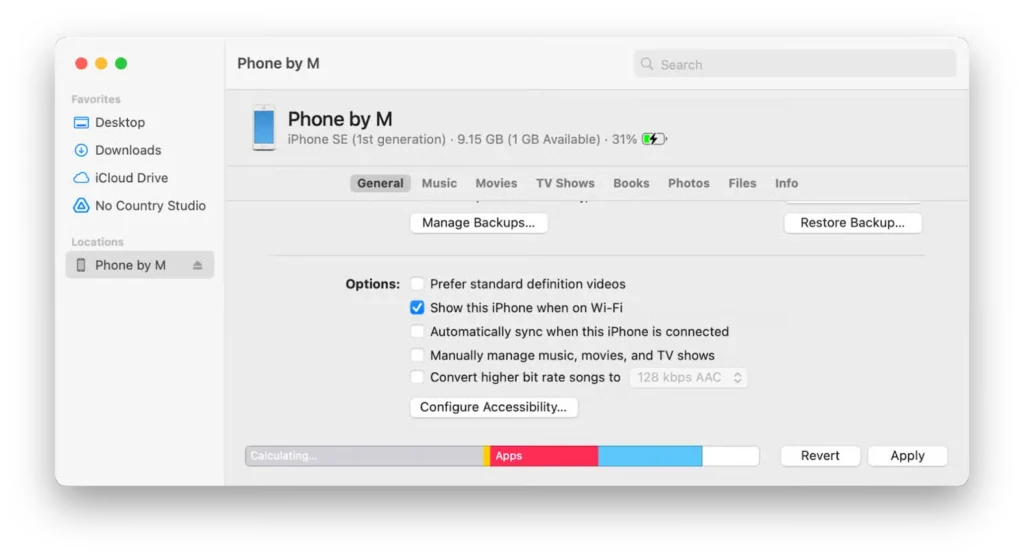
- Connect your iPhone via cable first (required for initial setup).
- Open Finder and click your iPhone under Locations.
- On the General tab, scroll down and tick “Show this iPhone when on Wi-Fi” (see the red arrow in the image below)
- Click Apply.
Source: Setapp
Once you’ve followed the above four steps, your iPhone will appear in Finder over Wi-Fi whenever it’s on the same network as your Mac. You can then click Back Up Now without ever plugging in. It’s a little slower than wired, but perfectly fine for regular backups.
Method 3: How to Back Up iCloud Data on iPhone
Many users have a common query: How do I back up an iPhone to a Mac without a cable at all? The honest answer: you use iCloud instead. iCloud backup runs automatically in the background. No Finder or cable required.
iCloud backup kicks in automatically when your iPhone is locked, connected to Wi-Fi, and plugged into a charger. You don’t need to do anything. It just happens.
How to Turn On iCloud Backup
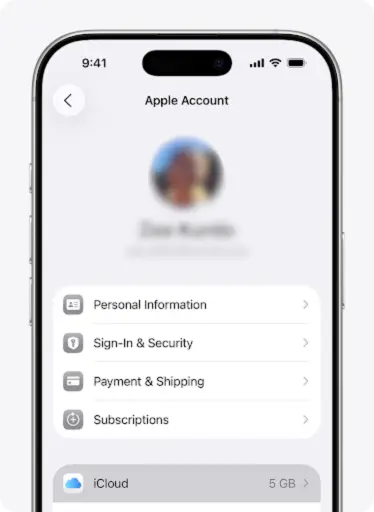
- Go to Settings on your iPhone.
- Tap your name at the top.
Source: Apple (Image © Apple Inc. Used for commentary/review purposes)
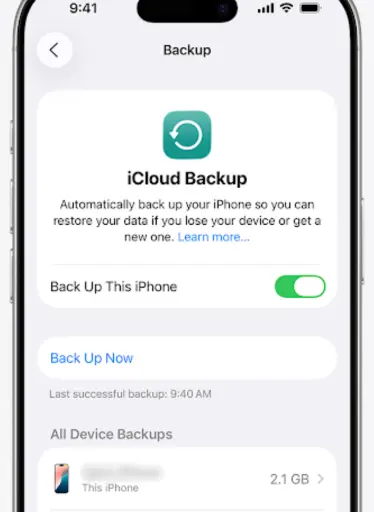
- Tap iCloud → iCloud Backup.
- Toggle on “Back Up This iPhone.”
Source: Apple (Image © Apple Inc. Used for commentary/review purposes)
To run a manual backup instantly, tap Back Up Now on that same screen.
The iCloud Storage Situation
Here’s the thing Apple doesn’t make very obvious: every iCloud account comes with 5GB of free storage. That’s shared between your backups, iCloud Photos, iCloud Drive, and everything else. Five gigabytes fills up fast, sometimes after a single backup.
If you run out of storage, iCloud will quietly stop backing up your phone. The fix is iCloud+, Apple’s paid storage plans:
- 50GB: $0.99/month
- 200GB: $2.99/month
- 2TB: $9.99/month
- 6TB: $29.99/month
- 12TB: $59.99/month
You don’t have to upgrade, but you should know the 5GB limit exists. If your iCloud backup keeps failing, storage is almost always the reason.
What iCloud Backup Does Not Include
iCloud backup skips anything that’s already syncing to iCloud, like iCloud Photos and iMessages (if Messages in iCloud is on). Apple Mail data is generally not included in iCloud backups because emails are stored on your mail provider’s servers (such as iCloud, Gmail, or Outlook) and re-sync automatically when you sign in.
However, this depends on how your email is configured. If you use POP (Post Office Protocol) accounts or store emails locally, some data may not be recoverable from iCloud alone.
iCloud backup also doesn’t include Face ID or Touch ID settings, Apple Pay data, or content you’ve downloaded from the App Store or Apple Books. All of that can be re-downloaded or re-synced when you restore.
Method 4: How to Back Up iPhone to an External Hard Disk
If your Mac doesn’t have much free storage, or you want an off-Mac copy of your data, you can move your iPhone backup to an external hard drive. This is a slightly more advanced step, but it’s not complicated if you follow along carefully.
Step 1: Create a Finder Backup First
Run a standard Finder backup using the wired steps (Method 1) above. Your backup will be saved on your Mac:
~/Library/Application Support/MobileSync/Backup/
You can get there by opening Finder → Go → Go to Folder and pasting that path.
Step 2: Copy the Backup Folder to Your External Drive
Plug in your external hard drive. Open the Backup folder and copy the entire contents to your external drive. That’s a complete, usable copy of your backup stored off your Mac.
Step 3 (Optional): Redirect Future Backups to the External Drive
For users comfortable with a small amount of Terminal work, you can create a symbolic link (symlink) that tells your Mac to save all future Finder backups directly to the external drive. This involves deleting the original Backup folder, then running a Terminal command to link the external drive path in its place.
If the external drive is not connected, Finder may fail to back up your iPhone or not save backups properly, sometimes without clearly notifying you. This can leave you without a usable backup.
If that sounds like more hassle than it’s worth, simply copy your backup to the external drive manually after each wired backup. Either approach works.
What Your Mac Backup Actually Includes (and What It Doesn’t)
Many people assume a backup literally saves everything. It doesn’t, and being honest about that is more useful than pretending otherwise.
A Mac (Finder) backup includes:
- Photos and videos (unless iCloud Photos is on). If iCloud Photos is enabled with ‘Optimize iPhone Storage,’ full-resolution originals may only exist in iCloud, not on your device or in your Mac backup
- Text messages and iMessages (unless Messages in iCloud is on)
- Contacts, calendars, and notes
- App data and settings
- Home Screen layout
- Voicemail
A Mac backup does NOT include:
- App Store apps and Apple Books PDFs (they’re re-downloaded automatically on restore)
- Content synced from your Mac, like imported MP3s or manually added video files
- Data already living in iCloud (iCloud Photos, iCloud Drive files)
- Face ID / Touch ID settings
- Apple Pay cards and settings
- Activity, Health, and Keychain data, unless you turn on encrypted backup
That last one trips people up more than anything else. If you use Apple Health and want that data in your backup, an encrypted backup is not optional, but it’s the only way to save it.
How to Check If Your Backup Was Successful
In Finder
Open Finder, click your iPhone under Locations, and look at the General tab. Just below the backup options, you’ll see the date and time of your most recent backup. If it says “today” at a recent time, you’re good!
You can also go to Manage Backups from that same screen to see a full list of stored backups, their size, and when they were made.
In iCloud
On your iPhone, go to Settings → [Your Name] → iCloud → iCloud Backup. The screen will show you the exact date and time of your last iCloud backup. If it says “Never” or shows a date from several weeks ago, something is likely blocking it, which is usually a full iCloud storage account.
How to Restore an iPhone from a Mac Backup
‘How to restore an iPhone from iCloud backup on a computer’ is one of the most-searched follow-up questions for a good reason, as people back up their data but forget how to get their data back.
Restoring from a Finder Backup
- Connect your iPhone to your Mac via cable.
- Open Finder and click your iPhone under Locations.
- On the General tab, under Backups, click Restore Backup.
Note: Restoring a backup will first erase all existing data on your iPhone. Make sure any current data is backed up before proceeding.
- Choose the backup you want to restore from (you’ll see the date and size).
- Click Restore and wait for the process to complete. Keep your iPhone connected.
If you’re setting up a new iPhone, like moving everything over to a brand-new model, this is exactly the process you’d use. If you’ve already transferred data to your new iPhone, a Finder restore is the manual alternative when Quick Start isn’t available.
Restoring from iCloud
During iPhone setup (on a new or freshly erased device), choose Restore from iCloud Backup when the setup assistant asks how you’d like to set up your iPhone. Sign in to iCloud, pick the most recent backup, and let it run. You’ll need Wi-Fi and some patience, as it can take a while depending on backup size.
iCloud vs Mac Backup: Which Is Better?
Here’s the honest answer: use both if you can.
iCloud backup is effortless and automatic. It runs in the background every day without you thinking about it. But it depends on having enough iCloud storage, a stable Wi-Fi connection, and a phone that’s regularly charging.
If any of those are missing, the backup stops happening.
A Mac backup is more deliberate. You plug in, hit Back Up Now, and you know it ran. It’s a complete snapshot stored locally, not dependent on any subscription or cloud service. And with encryption turned on, it includes data that iCloud backup skips entirely.
The smart move: Keep iCloud backup on as your daily safety net, and run a Finder backup before any major iOS update or big life event (new phone, international travel, cracked screen repair). That way, you’re covered from both ends.
If you’re setting up iCloud for the first time, it’s also worth double-checking which apps are actually storing data in iCloud that affects what your backup needs to cover.
Quick Tips Before You Go
A few things worth knowing that most guides skip:
- Don’t unplug the cable during a Finder backup
Interrupting the cable midway can corrupt the backup file. Wait for the progress bar to disappear completely.
- Make sure your Mac has enough free space.
If your Mac’s drive is nearly full, Finder backup will fail silently. Check storage before you start.
- Back up before every major iOS update
iOS updates are generally smooth, but edge cases happen. A backup right before an update means you can restore your data if something goes wrong.
- Encrypt if you use Health, Activity, or Keychain.
If you track workouts, sleep, medications, or health metrics, none of that saves without an encrypted backup. Turn it on once, and leave the rest to it.
- Check your last backup date every couple of weeks.
It takes five seconds in Finder or iCloud settings and confirms everything is working as expected.
The Takeaways
Backing up your iPhone isn’t something you should have to think about more than once. Set it up, verify whether it works, and let it do the rest. If you’re on a Mac running Catalina or later, Finder backup is reliable, free, and takes less than ten minutes to configure.
Add iCloud backup as your daily automatic safety net, and you’re genuinely well-covered. Now that you know exactly how to back up your iPhone, the only bad backup is the one you didn’t make.
Frequently Asked Questions
How long does an iPhone backup to Mac take?
Most iPhone backups take between 5 minutes and 1 hour, depending on storage size, cable speed, and whether it’s your first backup. First-time backups are usually the slowest.
Does backing up an iPhone save photos?
Yes. Finder backups include photos stored locally on your iPhone. However, if iCloud Photos is enabled with Optimize Storage turned on, some full-resolution photos may only exist in iCloud.
Can I use my iPhone while it’s backing up?
Yes, but heavy activity like recording videos, gaming, or downloading large files may slow down the backup process.
Do encrypted iPhone backups require a password?
Yes. When enabling encrypted backups, you must create a password. Without it, you cannot restore encrypted backup data later.
Will restoring an iPhone backup overwrite current data?
Yes. Restoring a backup replaces the current data on your iPhone with the data from the selected backup.
Note: All steps in this guide are based on Apple’s official support documentation as of 2026. Features and interface may vary slightly depending on your macOS or iOS version. Always ensure your devices are updated before following backup or restore steps.
Note: All prices mentioned are in USD and correct as of the publishing date. Prices may be subject to change, and TechWhisp recommends checking directly with Apple or your preferred retailer for the most up-to-date pricing. TechWhisp cannot be held responsible for any price changes after publishing. TechWhisp cannot be held responsible for any price changes after publishing.